|
|
|
TEN STEPS TOWARDS A BETTER V1
It could be said that the V1 is the bread and butter of skating. Veteran skaters know of its energy efficiency in uphill terrain and certainly wouldn’t leave it at home if they were going out for an easy skate day. These skaters have practiced and refined the technique into pure efficiency. As a skier, the following ten steps have allowed me to help preform this movement efficiently by breaking down the technique into simple and deliberate parts. In the high-end racing arena, the V1 is primarily an uphill technique. In flat terrain, World Class racers rarely use the V1 and opt for the higher speed gears such as the V2 or V2 Alternate. Many of us however (myself included), will not have the strength, ability, or desire for anything other than the V1 in uphill terrain. The V1 brings skating to the masses and leaves the sweat induced workout to the aerobic animals. Remember that technique will change according to the terrain. Weight transfer and side to side body movement will be more extreme in flat terrain to allow the skier to maintain balance over a flat ski and glide. The high end racer tones down the upper body movement and focuses on tempo to get them up the hill as fast as possible. Here’s that discriminating look to help make the V1 skate as energy efficient as possible. 1.TIMING. The timing requires planting both poles as one foot lands on the snow. It’s this simultaneous pole and foot plant that powers the V-1 and sets it apart from all the other skate moves. For timing, think about contact points hitting the snow. Each pole is a point of contact as well as each foot. Three points of contact (both poles and one foot) hit the snow, then one point of contact (the other foot) hits the snow to complete the cycle. During the ‘3’ we plant both poles and one foot . During the ‘1’, the opposite foot lands. Call out the 3 and 1 verbally and plant the poles and feet accordingly. Keep this motion fluid with a constant rhythm between each step. We can listen for the correct timing too. There should be only two sounds in the cycle. Listen for one sound as both poles and one foot lands, then total silence broken by the sound of the other foot landing on the snow. 2. POWER SIDE Once we figure the side we’re planting on, it’s time to define some verbal technobabble of the V1. The side that we plant on is called the Power Side. Let’s imagine for now that we’re planting on the left side . That left side is our Power Side. For ease of understanding let’s also call the left pole our Power Pole. The opposite side (the side we’re not planting on) is called the Glide Side . Let’s call that pole the Glide Pole. 3. VERTICAL POLE PLANT. Use the wrist to plant the pole tip forward. A common mistake is to reach the pole forward with a straight arm. Bend that arm slightly and reach the basket forward by flexing the wrist. 4. POWER POLE PUSH
Keeping this pole parallel with the ski helps direct most of our energy in the same direction our Power Ski is moving. This also helps us to experience a true balance over the Power Ski. Our nose should center near that ski at the start of the pole push, allowing that ski to remain flat over the snow for better glide . 5. BOTH POLES PARALLEL 6. DA PLANE, DA PLANE A common mistake is moving the hands in a circular motion in front of the body; bringing the hands toward the right ski them moving them above the left ski to start the push. Return the arms in the same plane that we utilized during the pole push. 7. ARM FOLLOW THROUGH To help timing and power, concentrate on a complete follow-through of the pole push. Our arm movements shouldn’t stop at the hips but continue behind . Pole straps should be snug for a relaxed grip and full hand release of the poles following the push. 8. DOWN-UP N’ PUMP
After the poles plant, our downward motion begins. Compress the upper body over the poles for a more powerful push . The amount of compression is individual and depends on the skiers strength and terrain. Maximum compression has the skier’s back ending nearly horizontal to the snow with much less compression on steep uphills. Next comes the fun part. Stay low until our Glide Foot (right) lands on the snow . After the Glide Foot lands, then begin to straighten that leg to stand tall until the next pole plant cycle . The key to this rising motion is to begin straightening our gliding leg after the foot lands on the snow. For maximum extension, imagine our gliding leg is getting pumped-up with air. Once it lands, we slowly begin to pump the glide leg until it straightens , then begin another step and pole plant. The result of this rising motion is that our ski continues to glide. Ideally, we’ll want to pump both legs for maximum push off of both skis. During the Pump try not to full straighten the upper body. The upper body should maintain a slight forward lean at all times . Remember the timing: lower during the pole push and staying low until the other foot (the glide foot) lands on the snow. The landing of the Glide Foot triggers the up motion of the body and straightening of that leg. 9. NO SNIFF
To enhance glide over both skis we’ll start to fine tune the movements of our upper body. Up to this point, we’ve concentrated on balancing over a flat ski to start our double pole push. A flat ski requires balance and results in optimal glide. Our next and most important goal is to move our balance to set our Glide Ski flat on the snow. To feel the required movement, find a gradual downhill section of trail and begin skating without poles. For maximum glide concentrate on setting each ski flat on the snow. For flat ski balance, try the No Sniff Rule. Imagine my mother and her pre-Sunday school inspection of my brother and I. Standing side by side for Mom’s inspection, she’d lean over each of us, curling her nose and sniff to check if we we’re properly clean. Let’s inspect our skis each time we set them down to glide by centering our nose directly over each ski . To enhance the No Sniff Rule, think about the shoulders. Move the shoulders square to the ski tip prior to stepping down the foot for better flat-ski balance . Let the upper body rotate from the hips to move the shoulders square with each ski. Continuing without poles, notice that our upper body begins moving towards the other ski prior to setting that foot down. Our nose is actually above the ski before it’s set on the snow . Our body maintains a constant motion with our nose moving toward the other ski prior to setting the foot down. This motion is the same movement to use when skating with poles in flat terrain and less extreme on uphills. 10. NO-POLE-TO-POLE The side to side movement is important in all terrain. World Class skiers will not move the nose completely over the ski due to steep terrain and high tempo. Their head will move to the inside of each ski. The recreational skier should practice the extreme form of upper body movement because the flat terrain allows them to glide longer. Practicing this movement will give the feeling of flow and rhythm in your current ability level and allow you to tone it down in the future and still have the correct movements of balance and glide. References: |
|
|
CLASSIC TECHNIQUE: Diagonal Stride; Adjusting Pole Straps; Arm Swing; Double Pole; Kick-Double Pole. CLASSIC UPHILL TECHNIQUE: Classic Uphill Diagonal; Edging; Side Step; Herringbone. DOWNHILLS AND TURNING: Getting up from a fall; Kick Turn; Track Snowplow; Five Tips for the Diagonal Stride; Kick Double Pole. SKATE SKIING: Ten Tips for the V-1; V-2 skate technique; Marathon Skate. ALL AROUND: Stationary Turns; Step Turns. RESOURCES: Nordic Glossary; 20 Q and A; History of Cross Country Skiing ©2010-2022 SkiXC.com All Rights Reserved in All Media |
|
 Correct timing of pole and leg movements are key in all the skate moves. The reason the V1 is so powerful and efficient for uphills lies in it’s combined pole push and skate movements of the legs. It’s this timing and high tempo capability that make the difference between an effortless uphill climb or painful, sweat-induced slog.
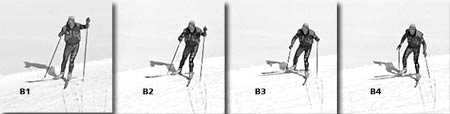 To increase balance on the Power side, keep the Power Pole parallel with the Power Ski for the start of the pole push. Plant the pole tip close to the ski then imagine we’re pushing that hand down towards the ski tip to begin the push. The pole won’t stay parallel with the ski the entire push but at least for the first third of the push
  Utilizing an up and down body motion during the V1 will help maximize our pole and leg power.
 Now grab the poles for the No-Pole-To-Pole exercise. Take a few skates while holding the poles up off the ground. Focus on a flat ski and the No Sniff rule. Feel our upper body move from side to side, centering our nose over the ski just prior to setting it down. Continue skating a few more steps but then plant the poles, keeping the upper body and nose moving as we did skating with out poles. Go back to four steps without planting the poles then another four steps planting the poles keeping the upper body movement constant poling and not poling.